
Posters are a popular form of marketing and advertising. A cool poster design catches the audience's attention immediately, promoting a product or service effortlessly and to a wide range of people. Today, everything around us is available in digital format and accessible right at our fingertips. Thus, for jobs like poster printing, many rely on online poster printing or print shops. But, what if you want to make your own posters? Sounds cool, right?
While designing posters may not be everyone’s cup of tea, there is a unique value in creating a layout and then printing your own poster. Through online courses, many designers learn how to create digital advertisements, but not everyone understands the printing process.
If you are thinking of making a poster on your own, here is your chance to learn all the steps.
Step 1: Designing a Poster
Before you print your poster, you need to consider what you wish to communicate. Is this going to advertise a business in general, promote a limited-time offer, create awareness of a campaign, or simply decorate a bedroom? Depending on the type of poster you need, you can make a compatible design.
Brainstorm the Design
It's good to brainstorm ideas first before getting into action. First, think about the message you want the audience to grasp from the poster. Here are a few questions to think about while designing the draft.
- What is the message, call for action, or idea to be expressed?
- Who is your target audience?
- What design elements and images should be included in the poster? Photographs, logos, symbols?
- What colours would present the message most successfully?
Make a Layout Design
Before placing specific elements onto your poster, it is wise to arrange a layout first. The purpose of creating the layout is to make a design easily readable and understandable so that an audience can comprehend the message and respond immediately.
All the elements and colours in your design should be well balanced. You can follow grid lines to make the design and find the key spot where the audience would be directed to look first. Your focal point may contain a large and catchy font or an image. No matter what you use, the design should be coherent and logical.
A Few Tips You Can Follow
One possibility is to place the main element in the center of the grid. Or, you can keep the focal element away from the center by placing negative space on the other sides. Then, create a path using line, color, font, size, etc., to direct the audience towards the focal point. The “Rule of Thirds” is an accepted standard for balancing content within a composition: If the area is divided into thirds both vertically and horizontally, the subject should be placed at an intersection or along one of the lines.
Choose an Outstanding Font
The use of the right font is extremely essential for designing custom posters. A unique and outstanding font will create an impression about your purpose among the audience.
Keep in mind that viewers’ emotions are connected to the font style. Consider the intent of the poster, choose a compatible font that conveys the proper mood and is not too hard to read, and find the size that works best on your poster. You can also combine different fonts that complement one another: If one has flourishes or other loud features, try off-setting the excitement with a simpler font as well. Or you might want to choose one serif font and one sans serif. But multiple wacky fonts tend to be off-putting and give the whole poster an unpolished look.
Design Should Be Catchy and Readable
The purpose of custom printed posters is not just to show your creativity. Rather, it is about calling the audience to respond to the message you are trying to convey. Therefore, the design should be easily visible from far away and readable from a distance of about five feet. To achieve this, it is important to properly balance any graphics and text to ensure the poster effectively reaches the audience.
Additional Design Tips
Looking for even more pointers for creating a great poster design and printing like a professional?
Before brainstorming the design, it's good to do in-depth research and get design inspiration — take note of what features catch your eye as a viewer. But try not to copy designs from others.
While designing the poster, make sure the design is simple and clear to understand. Leave enough space between items -- people rarely stop to read something cluttered. Remember, less is more!
Step 2: Printable format
When you have completed designing the poster and are confident about it, it is time to save it in the right format. The formatting can be a bit tricky as different printers may be better equipped for some types over others. PDF is usually safe, but you may want to ask whoever will be carrying out your print job if they have a preference.
Choose a Suitable Program for Online Poster Design
Various computer programs exist for the purpose of designing things like posters. Some of them are already installed on your computer, and some designing-related apps are free to download. If you want more features and designing tools, then you might need to purchase designing apps online. Following are some of the programs you can use for designing a poster:
- Adobe Photoshop
- Adobe Illustrator
- Adobe Indesign
- Microsoft Powerpoint
- Apache OpenOffice Impress
- Linux LaTex
Set Dots Per Inch (DPI)
First of all, you need to set the DPI. Setting the DPI in the right format will reflect on the resolution of the poster. Generally, the DPI means the space between yellow, magenta, and cyan dots. The commonly used DPI for the poster is 300. Higher DPI means your poster will appear in a higher resolution, which naturally improves the quality of the final product.
Choose the Poster Size
The next thing you need to focus on is the size of the poster. To select the size, you need to think about where you are going to hang it. Standard poster sizes vary, the largest “A” size being A0 at over a metre in length. Such a size might work to apply stickers on a glass window or a big blank wall inside a large store, but if you are making a poster for a small office space like an office or classroom, you might choose A2.
If you want to print advertising posters, you’re limited only by the space you have available. And don’t think you have to stick to only “standard” sizes — if you’ve created an artwork to fill a window with unusual dimensions, it shouldn’t be a problem for most serious printers — but check with your supplier and ask for advice if you are not sure.
Format the Color in RGB or CMYK
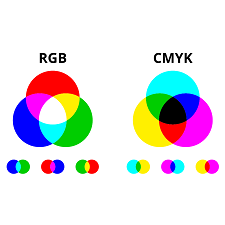
To format the color, you can choose RGB or CMYK. It will help you understand how the printed poster would look like. You just need to click on the menu bar button called “color mode” or “mode”. Then, from the drop-down menu, choose CMYK.
Set the Bleed
The bleed represents the background color. If you set it right, the final output won't have a white border at the edge. To set the bleed, you will find a specific setting that says “document bleed”. What the bleed does is add some extra colour to allow wiggle room when cutting. Generally, the bleed size is 3mm, but you can choose it in a bigger size as well. Requirements may depend on the printer you use. You can either set the bleed in a new document or while saving the file in PDF.
Format the Trim Lines
The trim line tells you the end of the bleed and edge of the document at the same time. It's the mark that shows where you need to trim or crop the document. To format the trim line, click on the marks and bleeds while converting to PDF. In most design applications, you will find an option for “crop marks” or “printer’s marks”, and just need to check the box.
Save the Design in PDF
The printable design format should be saved in PDF. This process is quite easy, but you can follow three of the following ways to do it.
- To save as PDF, click on “save as” and from the file type drop-down menu, choose pdf format.
- To export the file in PDF, click on File, then export. From there, choose PDF.
- To print in PDF, click on File and choose the print. Then select PDF to save the file.
- While saving the file in PDF, make sure the other settings like bleed size, trim mark, and color format are set, if necessary.
STEP 3 Printing the Poster
Before you decide to print the poster, you need to think about the material you are going to use for printing. There are different types of papers and printing surfaces that you can use for poster printing. Besides, a few things you need to think about while printing, here they are:
Type of Paper to Choose
For printing a poster, you need to pay attention to the type and weight of the paper. You can choose glossy or textured paper. These coated papers not only enhance the design and colour by lending a chic aesthetic to certain designs, but also protect the poster from catching dirt. But other types of works, like those imitating vintage illustrations, will likely benefit from an off-white paper with a matt finish.
Regarding the thickness, the weight of paper is measured in gsm (grams per square inch). If you choose large paper for poster prints, then thicker paper is usually better.
Choose the Printing Source
The most excellent poster design can result in a disappointing waste of effort if the final product is not of the best quality. It is wise to make careful, educated decisions at every step.
To do that, it is advisable to research first. You can print from a print shop or look for online poster printing services. There are a number of suppliers out there that offer poster printing london in various formats. One reliable and famous source is Print Britannia, a local East London shop that has been satisfying individuals and businesses alike for 14 years.
You can also consult with Print Britannia to get suggestions on which paper would be best for your custom poster design. Also, you can ask them whether they would print on the type of paper you prefer. They are available to discuss any concerns you may have and give you recommendations for the best outcome.
Deliver the PDF to the Printer
When you are satisfied with the printing company, you must deliver the poster design to them. To do so, you can send an e-mail with an attachment or upload the PDF on their website. Another option is to hand over the file on a portable USB or CD.
Request A Proof
Before you get the delivery of the final poster, always ask for a proof. It will help you understand how the printed poster would look like. Have a close look at the design, color, lines, bleed, crop marks, and every single detail, and point out the things that need to be corrected.
Usually, the companies send a digital file for proof. However, you can ask for paper proof which may help you to better understand. To do that, you may need to pay an additional charge, though the fee for a small-scale version would likely be very small, too.
Additional Printing Tips
Here are some tips or suggestions you can follow if you are struggling with printing format or choosing a service.
If you are having trouble understanding the functionality of the software you are using, check the instruction manual. You can also ask questions in forums or search for related issues online. You may find solutions from users who have encountered similar problems or professionals.
Before submitting the design to the printer, always discuss the details with them and ask them what format they accept.
If the final poster is not satisfactory to you, don't hesitate to talk to the company. They might help you give a better version or modify the identified problems. Though all printing companies may not have the option available, Print Britannia strives to provide the best customer service in addition to top-quality prints. Just convey your queries, and they will be happy to help you.
Final Thought
Though the option exists out there to compile a generic, bland, poster with your criteria simply plugged into an existing template, the outcome is rarely optimal. It's always self-satisfactory to know the process of designing and learn how to create a poster yourself. It will not only help you do the job on your own but also help you understand how things operate.
As you now know the process of designing and printing a poster, you can set an investment-worthy budget, get the job done professionally, and publish the poster from a reliable source.


Be the first to comment.